Get Ready For Your New Toilet
Toilet installation may seem like a daunting task, but with the right tools and a little bit of know-how, it can be a relatively straightforward process. The first step in replacing a toilet is to gather the necessary tools and materials. These will typically include a new toilet, a wax ring, a toilet flange, a hacksaw, a putty knife, a screwdriver, and Teflon tape. It is important to note that before you start the installation process, you should measure the rough-in of your current toilet, which is the distance from the wall behind the toilet to the center of the waste pipe. This measurement is important to ensure that you purchase the correct toilet for your bathroom.

Turn off that water!
The first step in toilet installation is to shut off the water supply to the toilet. This is done by turning the valve located behind the toilet clockwise. This valve is typically located on the wall behind the toilet, and it controls the flow of water to the toilet. Turning the valve clockwise will shut off the water supply and prevent any water from flowing into the toilet tank or bowl.
Once the water supply is off, it is important to flush the toilet to remove as much water as possible from the tank and bowl. This step is crucial as it will prevent water from spilling out and causing damage to your floor. It is also important to remove the water from the toilet tank to prevent the weight of the water from making the toilet difficult to remove.
After the water is off, you can disconnect the water supply line from the toilet tank by using an adjustable wrench. The water supply line is the pipe that connects the water supply valve to the toilet tank. It is typically made of plastic or metal and can be disconnected by turning the nut that secures it to the toilet tank counterclockwise. Be careful not to damage the pipe as you disconnect it.
It’s also important to empty the tank of the toilet, this can be done by removing the tank lid and using a sponge to remove the water. This will make it easier to remove the toilet and avoid any water spillage.
Release it from the floor!
With toilet installation, you obviously have to removing the old toilet. The process of removing the old toilet involves several steps, including removing the nuts that hold the toilet to the floor, loosening the toilet from the wax ring, and being careful not to damage the flange or the floor.
The first step in removing the old toilet is to locate the nuts that hold it to the floor. These nuts are typically located on the base of the toilet and can be removed with a wrench or pliers. It is important to use the right size wrench or pliers to ensure a proper fit, and to be careful not to strip the nuts while removing them.
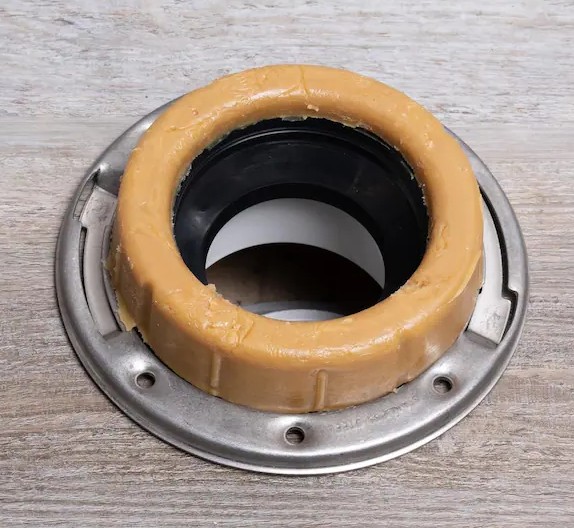
Once the nuts are removed, the next step is to gently rock the toilet back and forth to loosen it from the wax ring. The wax ring is a ring of wax that creates a seal between the toilet and the waste pipe. Gently rocking the toilet back and forth will break the seal and allow the toilet to be removed.
It is important to be careful when removing the old toilet to avoid damaging the flange or the floor. The flange is a circular piece of plastic or metal that connects the toilet to the waste pipe. If the flange is damaged, it will need to be repaired or replaced before installing the new toilet. Similarly, if the floor is damaged, it will need to be repaired before the new toilet can be installed.
It is also important to note that if your old toilet is glued to the floor, you will need to use a putty knife to loosen it. The putty knife can be used to gently pry the toilet loose from the floor. It is important to be careful not to damage the floor while doing this.

Prepare the Wax Ring
With the old toilet removed, it’s time to prepare the wax ring for the toilet installation. Start by placing the new wax ring on the flange, making sure it is centered. (Note: Most new toilets will include the ring with the toilet! Incase you need an extra, here is a link to some from Home Depot!)
Next, place the new toilet onto the flange, lining up the holes in the base of the toilet with the bolts in the flange. Press down on the toilet to compress the wax ring, creating a tight seal. This step is crucial as a proper seal will ensure that there are no leaks from the base of the toilet. It is also important to note that some toilets come with a plastic ring that needs to be placed on top of the wax ring, be sure to follow the manufacturer’s instructions.
Attach the Toilet to the floor
Once the new toilet is in place and properly aligned, it’s time to secure it to the floor. This is done by replacing the nuts that were removed earlier and tightening them with a wrench or pliers. The nuts are located on the base of the toilet and are typically located on either side of the waste pipe.
When tightening the nuts, it is important to be careful not to overtighten them. Overtightening the nuts can cause the base of the toilet to crack, which can lead to leaks and other problems. The proper way to tighten the nuts is to use a wrench or pliers and to turn them clockwise until they are snug. Once the nuts are snug, you can give them an additional quarter turn, but no more.
It is also important to ensure that the toilet is level. A toilet that is not level can cause a variety of problems, including leaks, and it can also be uncomfortable to use. To check the level of the toilet, you can use a spirit level. Place the spirit level on top of the toilet and adjust the nuts until the bubble is centered. This will ensure that the toilet is level and secure.
Another important thing to keep in mind with the toilet installation is to use of shims. If the floor is uneven, you might need to use shims to level the toilet. Shims are small pieces of wood or plastic that are placed under the toilet to level it. They can be easily cut to size using a utility knife. Once the shims are in place, you can then secure the toilet to the floor.
Toilet Installation is Nearly Complete!
Finally, it’s time to install the tank and bowl. Start by placing the tank on top of the bowl, lining up the holes on the tank with the bolts on the bowl. Then, install the tank-to-bowl bolts and washers, and tighten them with a wrench. Finally, attach the water supply line to the tank, and turn on the water supply valve.
Testing the toilet for proper function before use is an essential step in the installation process. It ensures that the toilet is installed correctly and is functioning properly. A properly functioning toilet is essential for both safety and sanitation.
When testing the toilet, the first thing to check is for any leaks. Leaks can occur from a variety of sources, including the base of the toilet, the tank-to-bowl connection, or the water supply line. To check for leaks, flush the toilet and observe the base of the toilet, the tank-to-bowl connection, and the water supply line for any signs of water.
Your toilet installation is now complete!
Enjoy your new toilet
Toilet Installation is a task that can be accomplished with a little bit of know-how and the right tools. By following these simple steps, you can haToilet installation is a task that can be accomplished with a little bit of know-how and the right tools. However, it’s important to remember that every toilet is different and that the installation process can vary depending on the specific toilet you are installing. That’s why it’s important to always follow the manufacturer’s instructions, which will provide you with specific information on how to install your particular toilet.
If all of this feels a little overwhelming, I don’t blame you. Here are Build and Move LLC, in just a few short hours, we’ll be ablt to install your toilet in no time!
If you would like one of our experts to do the installation for you, make a reservation on-line or give us a call or text!

